How to create your blog by hugo ladder in 30min
2022年8月14日 · 2471 字
This article is the second in a series on how to create you blog by hugo ladder for free, including using the hugo ladder configuration and integrate comments and analytics features, etc.
Hugo
why choose hugo
Most websites today fall into two categories - dynamic websites and static websites. Dynamic websites are server-based(or serverless), which can return different content depending on the user. They rely on a content management system (CMS) or database for rendering. So you need to pay for server costs.
Static sites generally display the same content to all users. They use server-side rendering to serve HTML, CSS, and Javascript files, which use static site generators (SSG) technology to display the same content to all users. The advantages of a static site include speed, security and SEO. it is also easy to maintain and highly scalable. Since Static Site Generators (SSG) store an already compiled page on a CDN, they load much faster.
We can choose to host to CDNs or platforms for free Netlify, Heroku, GoDaddy, DreamHost, GitHub Pages, GitLab Pages, Surge, Firebase, Google Cloud Storage, Amazon S3, Rackspace, Azure, CloudFront.
These are among the common SSG solutions: Hexo, Jekyll, Hugo or Next. js.
-
Hexo is Node.js based with support for multiple templating engines, integrations with NPM packages, and one command deployment. But it lacks detailed documentation when develop custom themes.
-
Jekyll is a static site generator written in Ruby and uses the Liquid templating language, has a vast plugin ecosystem, and is known to be beginner-friendly. One of the challenges when working with Jekyll can be the requirement of having a whole Ruby development environment to build your site.
-
Next.js is a awesome technology but I found that Next.js is not perfect in the plugin ecosystem of development blogs at the moment.
After comparing these technologies, I finally choose Hugo. Hugo is a fast, modern static website generator written in golang. It renders 5000 articles a second in benchmark tests and has a vast plugin ecosystem.
Install the theme Ladder
The theme of this blog is called ladder, which means reading as input and writing as output, both are ladders to gain knowledge.
Hugo Ladder repository URL:https://github.com/guangzhengli/hugo-theme-ladder
An already configured repository URL is: https://github.com/guangzhengli/hugo-ladder-exampleSite
If you want to practice with the hugo command or develop this theme, you can start with #configuration initialization step by step.
If you don't want to use hugo command, you can just clone already repository and then hugo server -D, and open http://localhost:1313/ in your browser. then you can jump directly to #Custom Configuration. No need to do configuration initialization.
git clone https://github.com/guangzhengli/hugo-ladder-exampleSite.git
hugo server -D
configuration initialization
Hugo provides a new command to create a new website:
hugo new site my_website
cd my_website
create an empty git repository and make this repository a submodule of your site directory:
git init
git submodule add https://github.com/guangzhengli/hugo-theme-ladder themes/hugo-theme-ladder
Because of my personal preference for yml format reading, this theme uses yml instead of the default toml format type to configure, so you can go to transform.tool to convert according to your preference.
Here is all configuration in the config.yml, you can delete the default config.toml file in the root directory and create a new config.yml file instead.
baseURL: 'https://hugo-ladder.pages.dev'
title: LADDER
theme: hugo-theme-ladder
license: MIT
licenselink: 'https://github.com/guangzhengli/hugo-theme-ladder/blob/master/LICENSE'
description: 'A fast, clean Hugo theme'
homepage: 'https://hugo-ladder.pages.dev'
defaultContentLanguage: 'en'
googleAnalytics: G-xxx
paginate: 10
params:
  brand: HOME
  avatarURL: /images/avatar.png
  author: Hugo Ladder
  authorDescription: A clean, fast hugo theme focused on Reading
  info: Build a free and beautiful blog site to record your thoughts and increase your influence
  favicon: /images/avatar.png
  options:
    showDarkMode: true
    enableImgZooming: true
    enableMultiLang: true
  darkModeTheme: data-dark-mode
  #darkModeTheme: icy-dark-mode
  comments:
    giscus:
      enable: true
      repo: username/repo
      repo_id: xxx
      category: Announcements
      category_id: xxx
      mapping: pathname
      position: top
      lang: en # pick a language from https://github.com/giscus/giscus/tree/main/locales
    utteranc:
      enable: false
      repo: username/xxx
      issueTerm: pathname
  analytics:
    google:
      SiteVerificationTag: xxx
    umami:
      enable: true
      website_id: xxx
      url: https://xxx
  guestbook:
    title: Guestbook
    description: Leave a comment below. It could be anything –- question, appreciation, information, or even humor.
  social:
    - name: GitHub
      pre: >-
        <svg xmlns="http://www.w3.org/2000/svg" width="20" height="20" viewBox="0 0 24 24" fill="none" stroke="currentColor" stroke-width="2" stroke-linecap="round" stroke-linejoin="round" class="feather feather-github"><path d="M9 19c-5 1.5-5-2.5-7-3m14 6v-3.87a3.37 3.37 0 0 0-.94-2.61c3.14-.35 6.44-1.54 6.44-7A5.44 5.44 0 0 0 20 4.77 5.07 5.07 0 0 0 19.91 1S18.73.65 16 2.48a13.38 13.38 0 0 0-7 0C6.27.65 5.09 1 5.09 1A5.07 5.07 0 0 0 5 4.77a5.44 5.44 0 0 0-1.5 3.78c0 5.42 3.3 6.61 6.44 7A3.37 3.37 0 0 0 9 18.13V22"></path></svg>
      url: 'https://github.com/username/xxx'
    - name: Dashboard
      pre: >-
        <svg xmlns="http://www.w3.org/2000/svg" width="20" height="20" viewBox="0 0 24 24" fill="none" stroke="currentColor" stroke-width="2" stroke-linecap="round" stroke-linejoin="round" class="feather feather-box"><path d="M21 16V8a2 2 0 0 0-1-1.73l-7-4a2 2 0 0 0-2 0l-7 4A2 2 0 0 0 3 8v8a2 2 0 0 0 1 1.73l7 4a2 2 0 0 0 2 0l7-4A2 2 0 0 0 21 16z"></path><polyline points="3.27 6.96 12 12.01 20.73 6.96"></polyline><line x1="12" y1="22.08" x2="12" y2="12"></line></svg>
      url: 'https://xxx'
languages:
  en:
    languageName: EN
    menu:
      main:
        - name: Blog
          url: /blog
          weight: 1
        - name: Tags
          url: /tags
          weight: 2
        - name: Archive
          url: /archives
          weight: 3
        - name: Guestbook
          url: /guestbook
          weight: 4
        - name: Dashboard
          url: https://xxx
          weight: 5
taxonomies:
  series: series
  tag: tags
build and run
First we find the default.md file in the archetypes folder in the root directory and replace its contents with the following file.
---
title:
date: {{ .Date }}
tags: []
series: []
featured: true
---
Here is summary.


here is your content.
Copy themes/ladder/exampleSite/content file to content in the root directory.
Create a new blog post named my-first-blog
hugo new blog/my-first-blog.md
Once created, you can use hugo server -D to build and run the blog and open http://localhost:1313/ in your browser to see your blog site.
Custom Configuration
multi language support
First, we need to determine which language is the default language of the blog website. Is it multi-language support? For example, defaultContentLanguage needs to be set to en if the default language is English. If the default language is Chinese it is zh.
In addition, if you don't need multi-language support, set params.options.enableMultiLang to false, and delete the other language configuration which below the languages.
modify the basic configuration
baseURL: 'https://hugo-ladder.pages.dev' #change to your https://username.github.io
homepage: 'https://hugo-ladder.pages.dev' #change to your https://username.github.io
params:
  brand: HOME # change to your brand of blog site
  avatarURL: /images/avatar.png # change /static/images/ file
  author: Hugo Ladder # your name
  authorDescription: # your desc
  info:  # website info
  favicon: /images/avatar.png # website favicon
  options:
    showDarkMode: true # dark mode support
You can open http://localhost:1313/ in your browser to see the result in real time while you modify it.
navigation
Currently this blog supports 4 default pages, blogs list, tags, history archives and guestbook.
You can adjust the name by modifying menu.main, if you want to add a new page in the navigation bar, remember to add the corresponding markdown file under content in the root directory.
Dark mode
Here are to dark mode theme currently, one is the default data-dark-mode theme, and the other is icy-dark-mode dark theme. Which can be replaced by modifying the value of params.darkModeTheme.
Social Icon
New social icons can be added by modifying the configuration file, the params.social field specifies name, icon, custom address and the icon can be found at this website feathericons.com.
Content management
posts management
If you create a new posts, it is recommended to fill the configuration which means:
title:
date: {{ .Date }}
tags: []
series: []
featured: true
titlepost titledatepublished datetagstagsseriesseries, it will be show related post below the content.featuredit will be show in home page featured post,trueorfalse
Rich content
This theme integrates Toggle and Tab group by default, The Toggle can hide code or content in #Configuration initialization, and the Tab group can toggle tabs to write content in #Install Hugo for example.
In addition, there are rich content such as youtube, twitter and site page jump integration. You can check rich content for details.
I also created a new repository https://github.com/guangzhengli/awesome-hugo-shortcodes to collect hugo shortcodes, you can go see if there are any you need, you can add them yourself.
GuestBook and comment integration
The guestbook and comments feature supports based on GitHub Issues for utteranc, and other based on GitHub Discussions for giscus
The steps to integrate both are simple, just follow the tutorials of utteranc and giscus, generate the configuration values and fill in the value of giscus in params.comments. This theme used giscus, and set false to utteranc.enbale.
Web analytics
The theme ladder can be integrated with Google analytics and umami for two kinds of web analytics.
For Google analytics you can get the MEASUREMENT ID which start with G-xxx to the googleAnalytics parameters from the document.
The integration of Google analytics is simple and free, but the disadvantage is that it is not privacy-protected (the data will upload to Google), and the analytics pages are slow.
So if you have the need to build umami to do the privacy-protected analytics, the process and steps I put in another blog How to build umami for free-to-use.
SEO
The theme has been optimized for SEO, including perfect meta tag information, etc. In addition, the default support Google Search Console, you can generate the google-site-verification to the params. analytics.google.SiteVerificationTag according to the document.
Deploy
There are also many ways to deploy, with the option of hosting to a CDN or platform Netlify、Heroku、GoDaddy、DreamHost、GitHub Pages、GitLab Pages、Surge、Firebase、Google Cloud Storage、Amazon S3、Rackspace、Azure and CloudFront 。
In this article, we have chosen the GitHub Pages for the tutorial.
Create GitHub account
Before building our blog site, we need to register a GitHub account. The account username is very important, which is the domain address of our blog site.
For example, if we create an account with the username guangzhengli, we will get our blog site which address is https://guangzhengli.github.io.
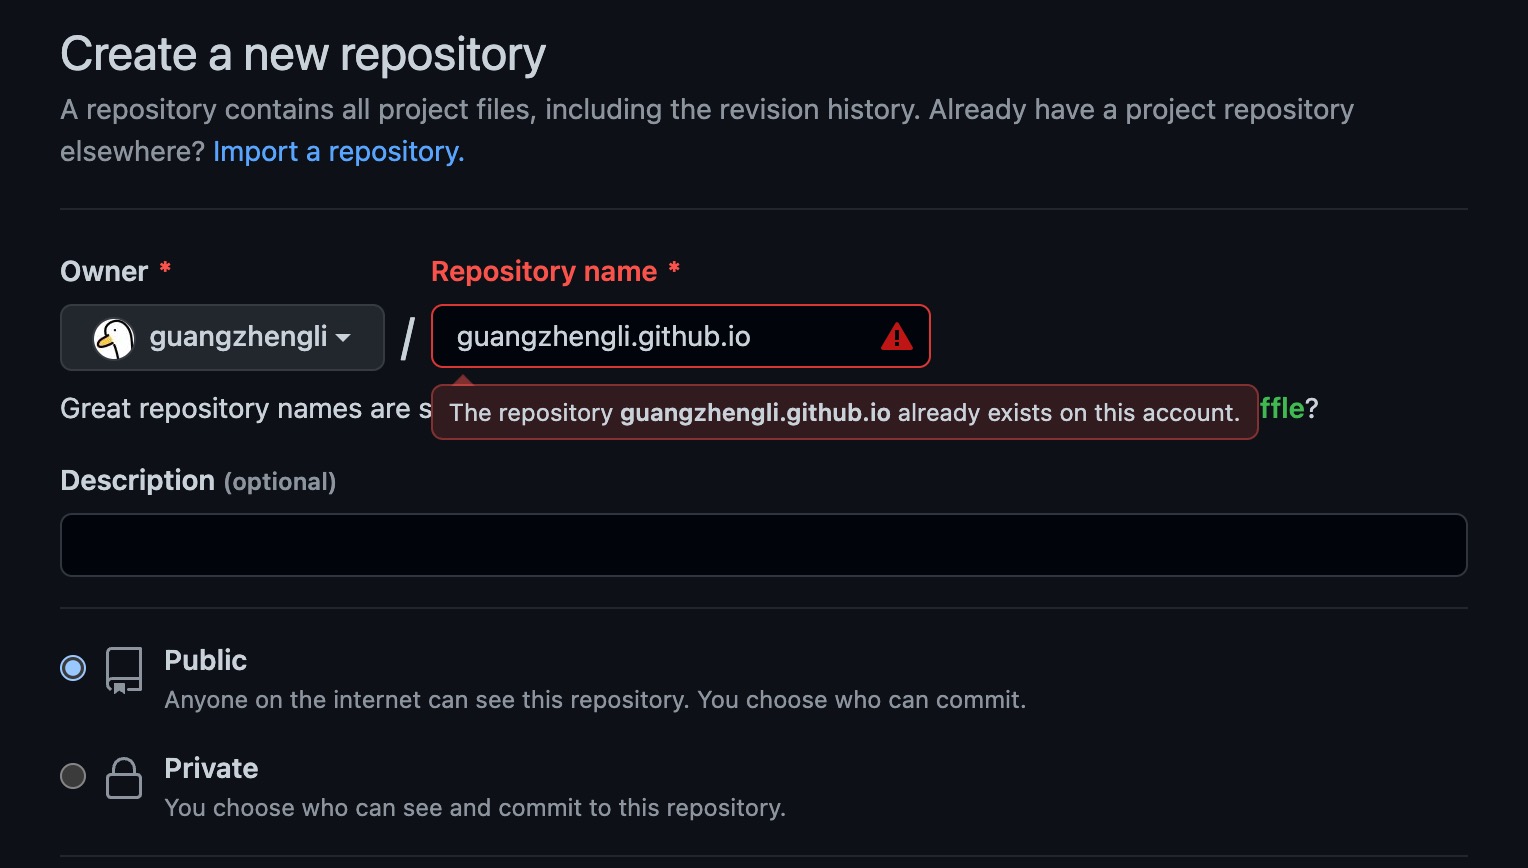
Create repository for GitHub Pages
You can find the full tutorial in the GitHub Pages Doc. It just need create a new repository with the repository name username.github.io.
Actions
There two ways to deploy blog used GitHub pages, one is to push directly to GitHub Pages, and the other is to generate static page code on the gh-pages branch. The code is available at https://github.com/guangzhengli/hugo-ladder-exampleSite/tree/master/.github/workflows.
If you did not clone the configured repository: https://github.com/guangzhengli/hugo-ladder-exampleSite. You need to create a new folder .github/workflows and add the new file gh-pages.yml file.
name: generate github pages to gh-pages branch

on:
  push:
    branches:
      - main ## Set a branch name to trigger deployment

jobs:
  deploy:
    runs-on: ubuntu-20.04
    steps:
      - uses: actions/checkout@v2
        with:
          submodules: true  # Fetch Hugo themes (true OR recursive)
          fetch-depth: 0    # Fetch all history for .GitInfo and .Lastmod

      - name: Setup Hugo
        uses: peaceiris/actions-hugo@v2
        with:
          hugo-version: 'latest'
          extended: true

      - name: Build
        run: hugo --minify

      - name: Deploy
        uses: peaceiris/actions-gh-pages@v3
        # If you're changing the branch from main,
        # also change the `main` in `refs/heads/main`
        # below accordingly.
        if: github.ref == 'refs/heads/main'
        with:
          github_token: ${{ secrets.GITHUB_TOKEN }}
          publish_dir: ./public
Deploy GitHub Pages
Enter the following command in the root directory of your project.
git remote add origin https://github.com/username/username.github.io.git

git add .

git commit -m "feat: init blog site"

git push origin main
Once we've made sure our push is successful. It'll automatically build the code into the files needed for GitHub Pages in Actions, so you can go to this address to check if workflow is running successfully. Be sure to replace username in the address with your account name. https://github.com/username/username.github.io/actions.
If Actions workflow successfully, we will have a new branch called gh-pages. Then go to the repository's settings center Settings, select Pages, and then Build and deployment -> Source and select Deploy from a branch. After that Branch select gh-pages to configure successfully.
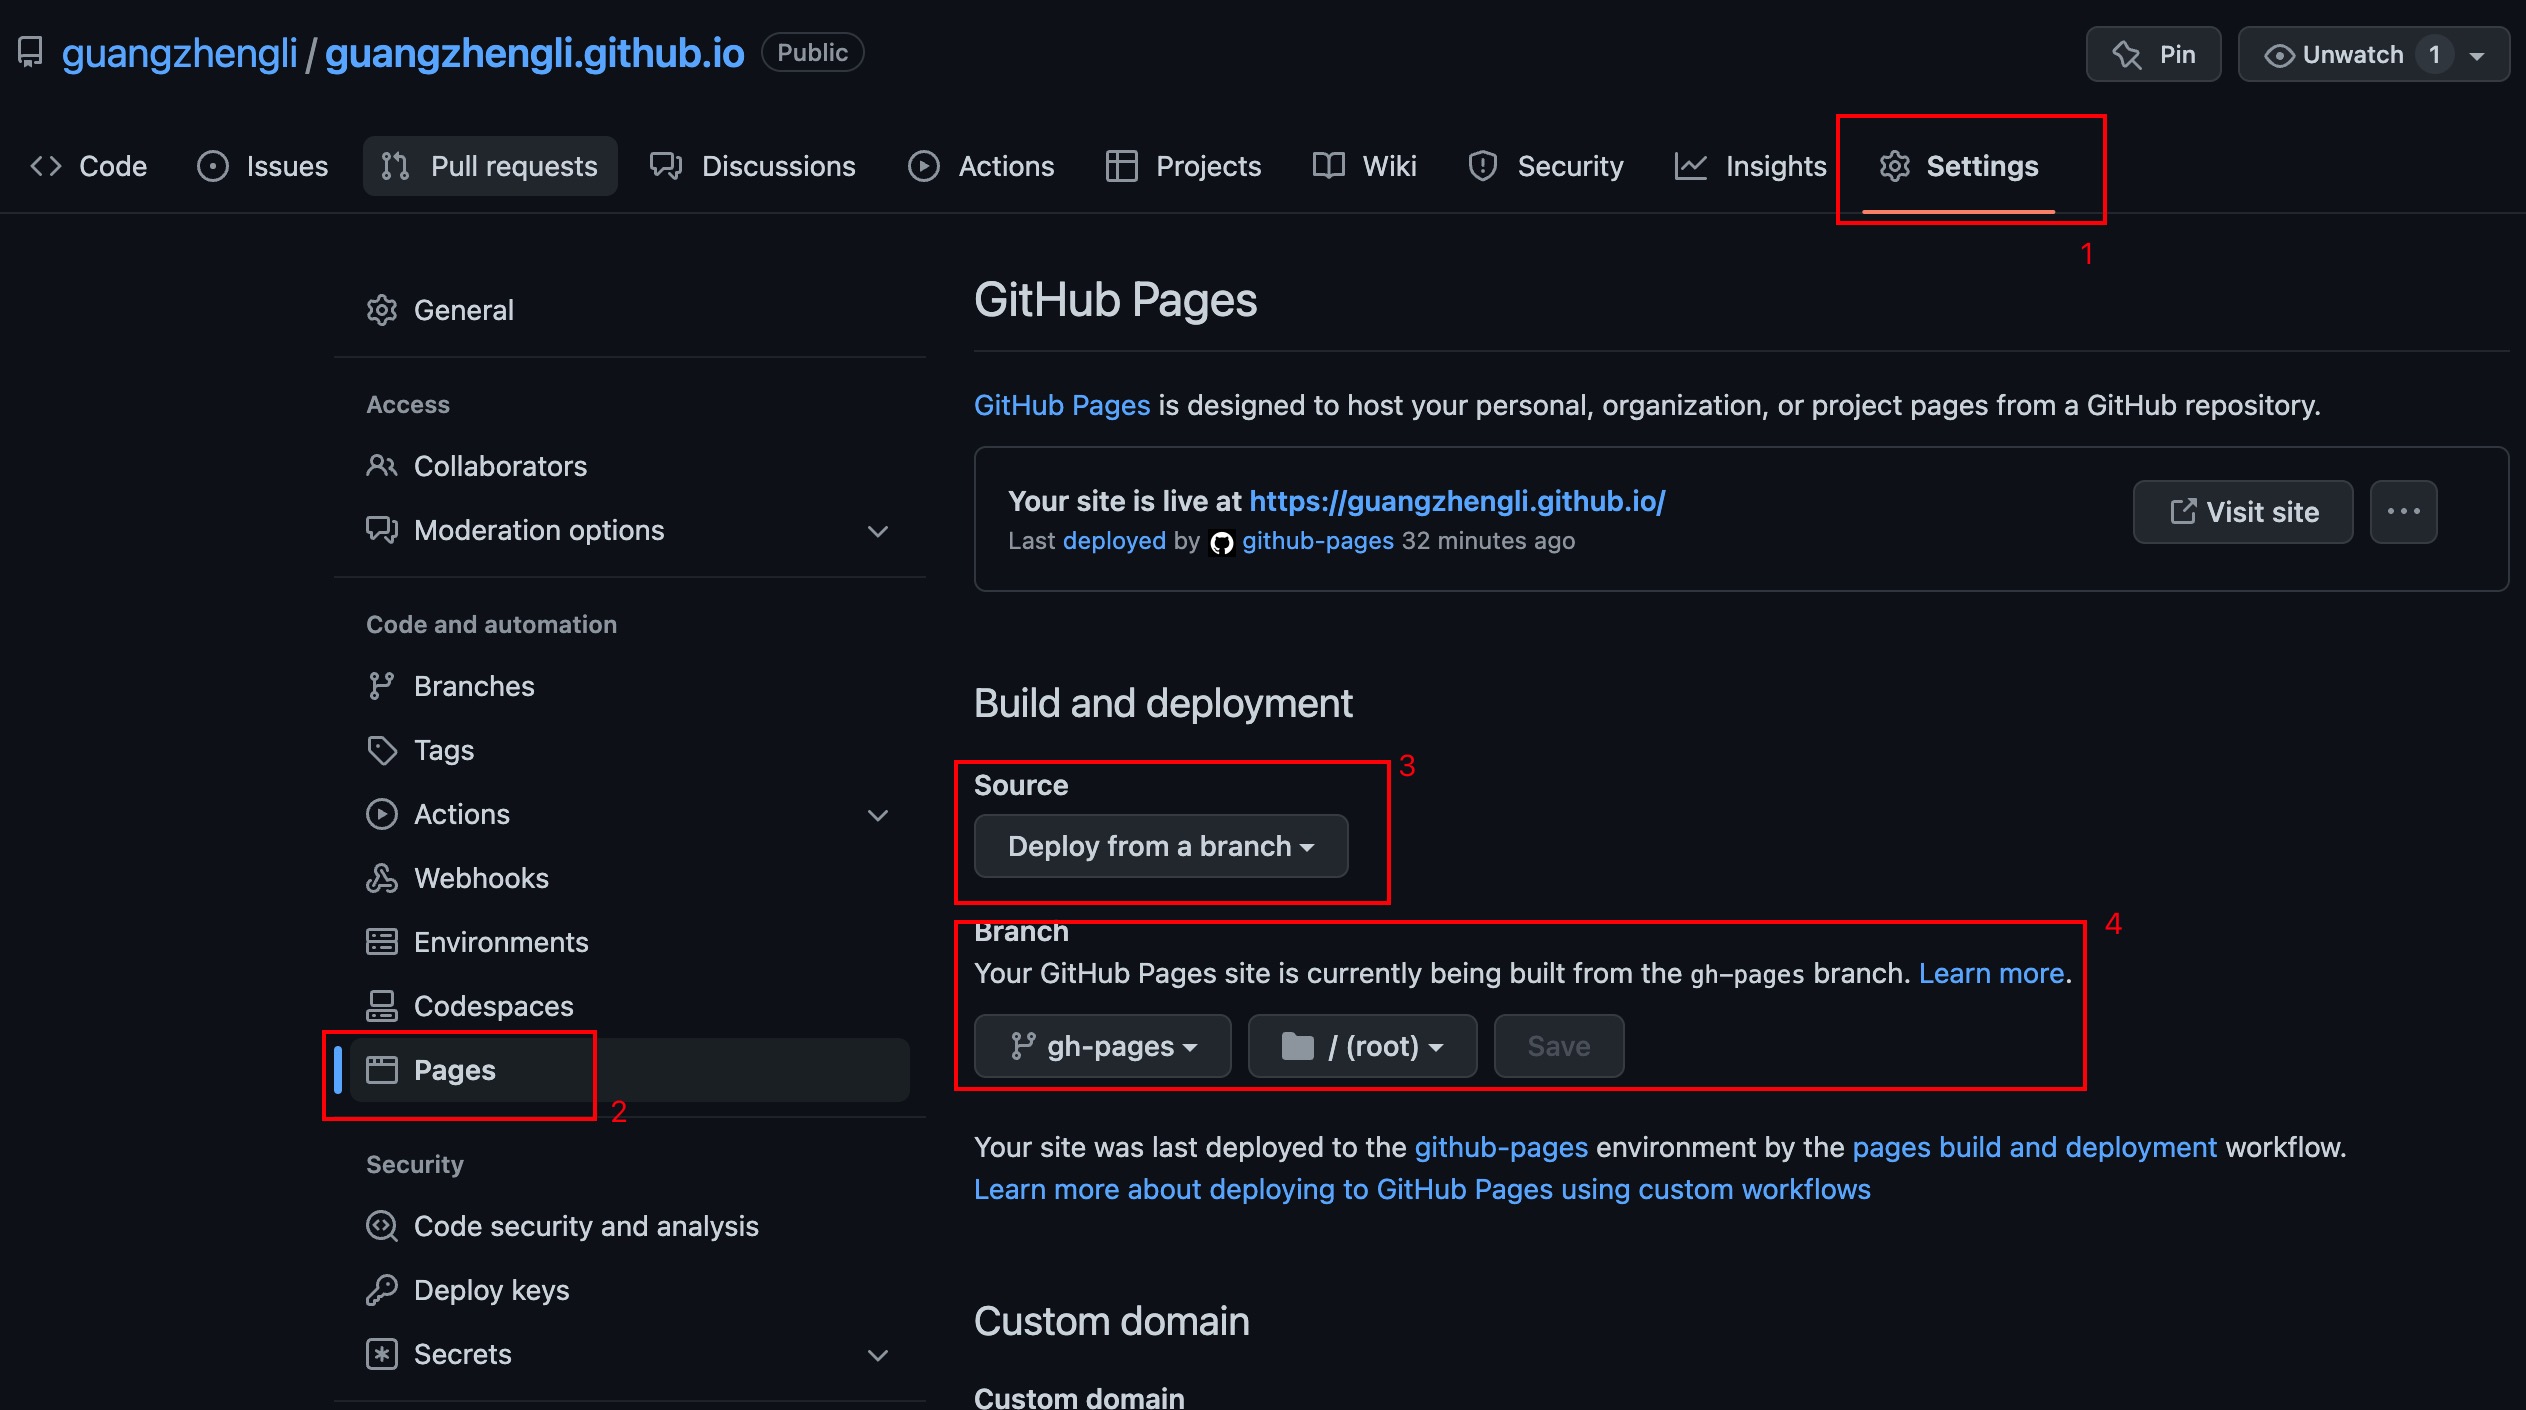
Then you can select Visit site to https://username.github.io for successful access! 🎉🎉🎉🎉
If you have any questions when deploying, you can leave a comment below.